
Before starting you will need to:
- Download and Install Seg3D (http://www.sci.utah.edu/cibc-software/seg3d.html), free segmentation software
- Download and Install MeshMixer (http://www.meshmixer.com/ ), free Mesh refinement software
Step One: Obtaining the Dataset
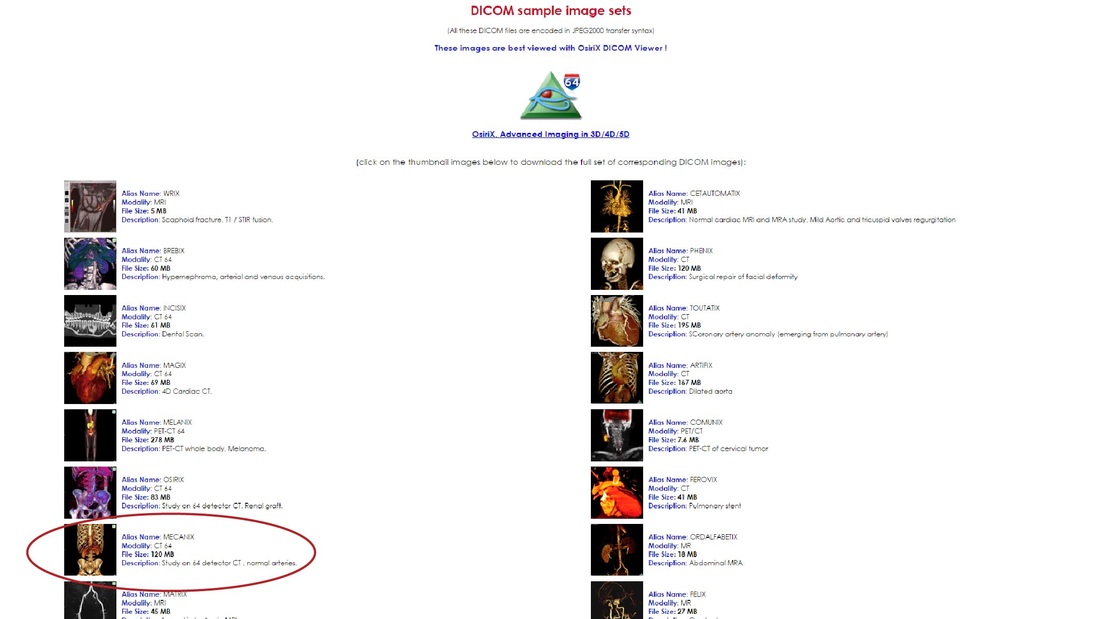
For this segmentation, we are using the MECANIX torso CT dataset, freely available from http://www.osirix-viewer.com/datasets/. The webpage is shown below with the relevant dataset highlighted. Save it somewhere you will be able to access easily
Step Two: Segmentation in Seg3D
1. Load Dataset
- Launch Seg3D, and select “Start New Project” from the launch window. Give the project an appropriate name
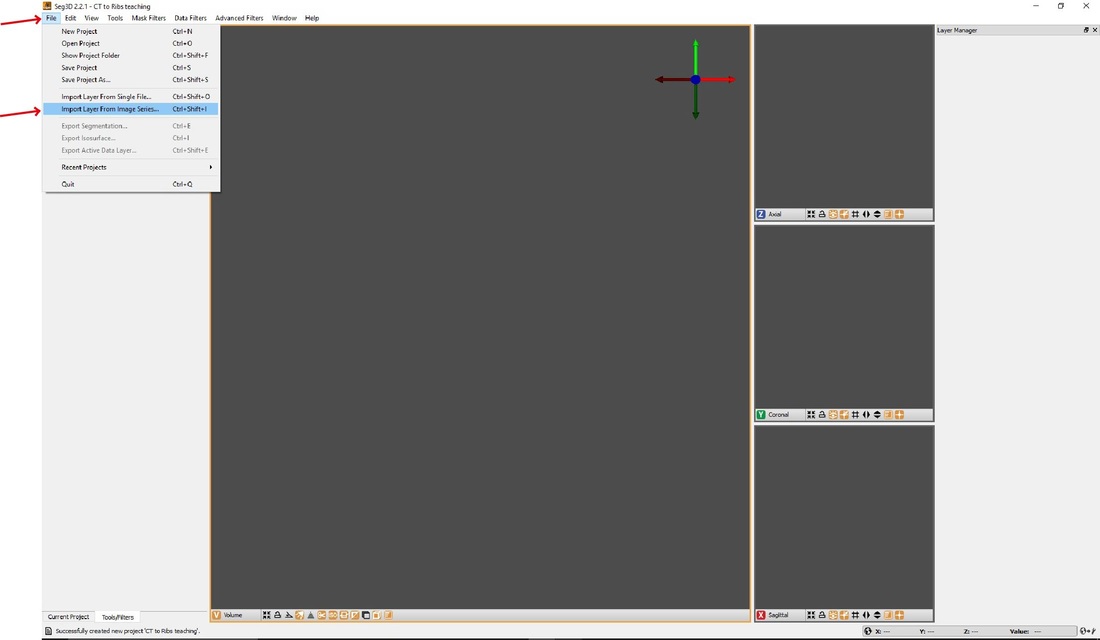
- Now you need to load the MECANIX Data. Click the File tab on the toolbar, and select “Import Layer from Image Series”
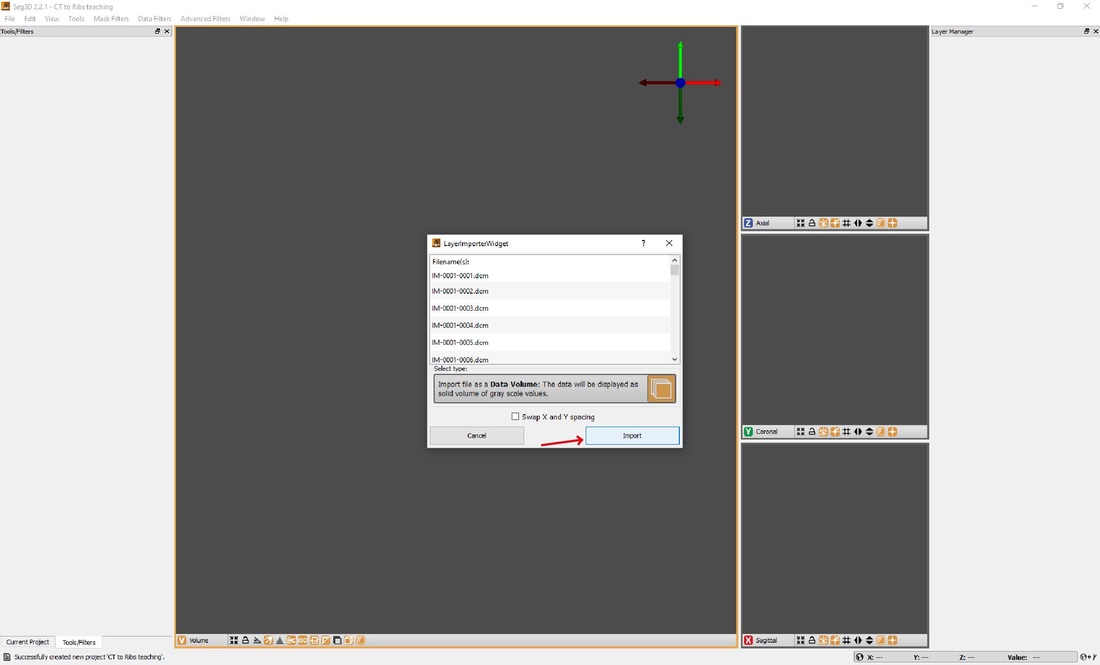
- Navigate to your saved MECANIX dataset. Then through the filesystem : MECANIX\MECANIX\MECANIX\Vasculaire ANGIO_AORTE (Adulte)\Aorte SPC 3.0mm – 3\
- Select IM-0001-001.dcm, a window will open, showing the list of .dcm files making up the dataset, and informing you that the data will be imported as a volume. Click “Import”
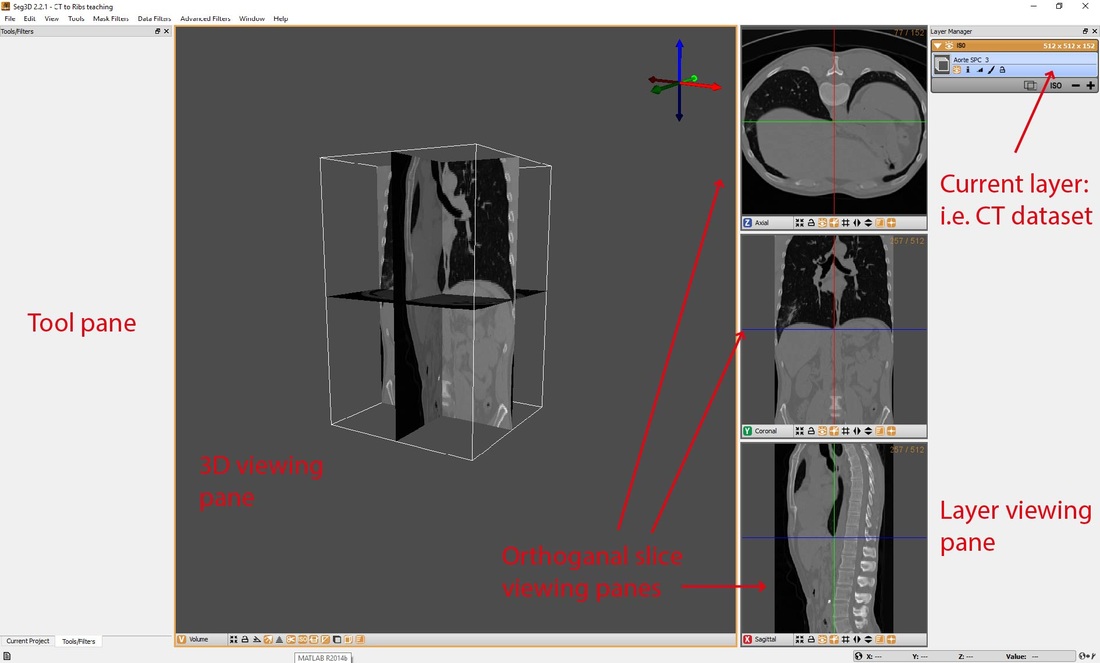
- The dataset should now be visible in the viewer and layer manager. Take a moment to get familiar with manipulating the image view and the Seg3D environment
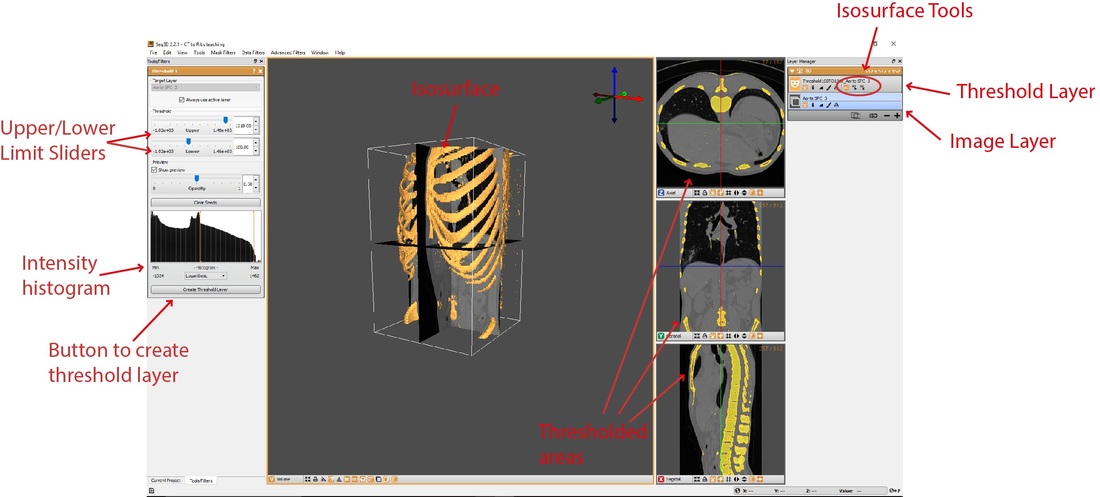
2. Thresholding
- The first step of this segmentation is an intensity based threshold. Select the “Tools” tab from the toolbar, and select “Threshold”
- A threshold tool will appear in the tool pane. Make sure that the CT image layer is selected and then set the threshold levels such that bone areas (specifically the ribs) are highlighted. A range from 100-1318 will work, but other values might also be fine – experiment!
- Once you are happy that the threshold effectively captures the ribs and bone areas, click “Create Threshold Layer”. A new layer will appear in the layer pane
- At this point you can use the isosurface tools to create and view a 3D model of your threshold segmentation. If you do so, you will notice that it includes several artefacts and non-bone volumes. These will be addressed later.
3. Cropping
- Now that we have a thresholded segmentation, we want to crop it to a useful area. Select the “Tools” tab from the toolbar, and select “Crop”
- Make sure that the threshold layer is selected for cropping
- Using the XYZ sliders, or the cropping box, select an appropriate volume of the thresholded rib layer. This example requires you to capture the entirety of the bottom four ribs on the left hand side. If you find it difficult, set the XYZ sliders to X:255, Y:54, Z:39
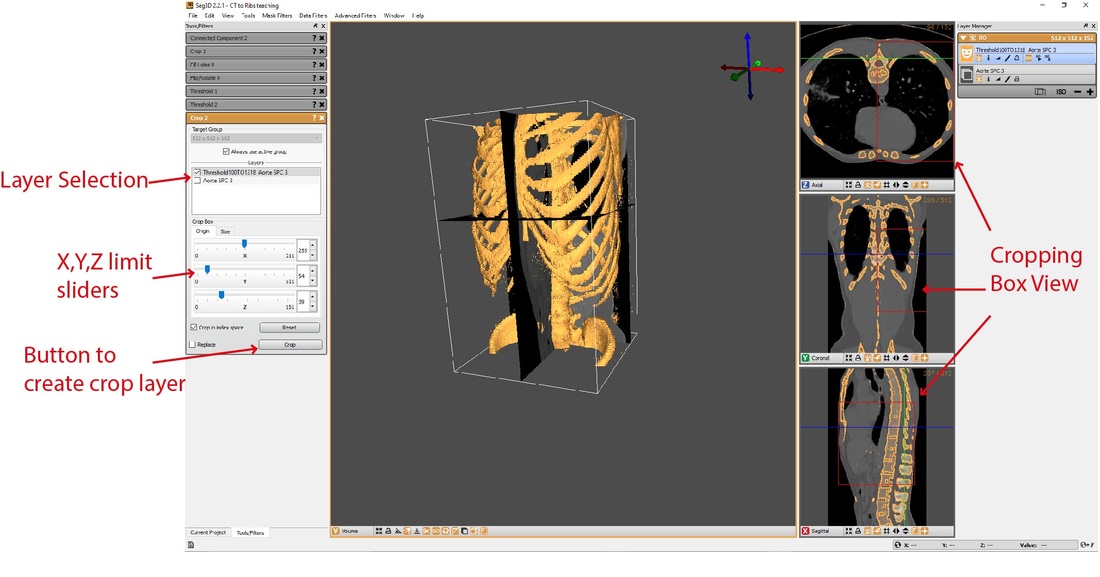
- Click “Crop” to create a new cropped layer. This can then also be visualised with the isosurface tools

4. Connected Component
- The next step is to use a connected component algorithm to isolate the contiguous rib component.
- Make sure the cropped, thresholded layer is selected. Select “Mask Filters” from the toolbar, and select “Connected Component”
- The connected component tool will open in the tool pane. This tool requires the user to create place some seeds on the desired volume. The algorithm then excludes any volumes not directly connected to those seeds
- Place some seeds on the rib model on one of the orthogonal viewing panes and then run the connected component filter
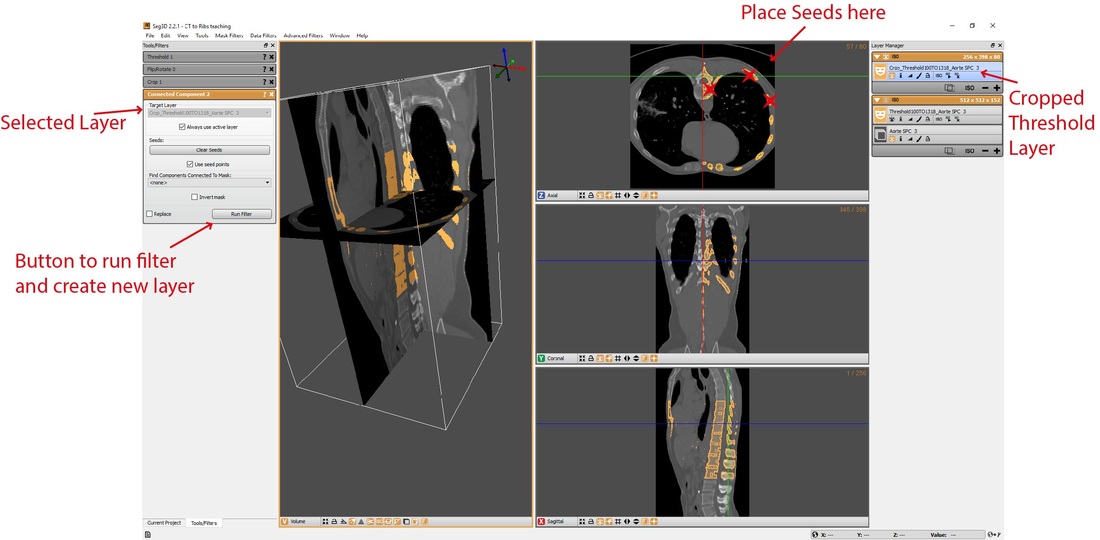
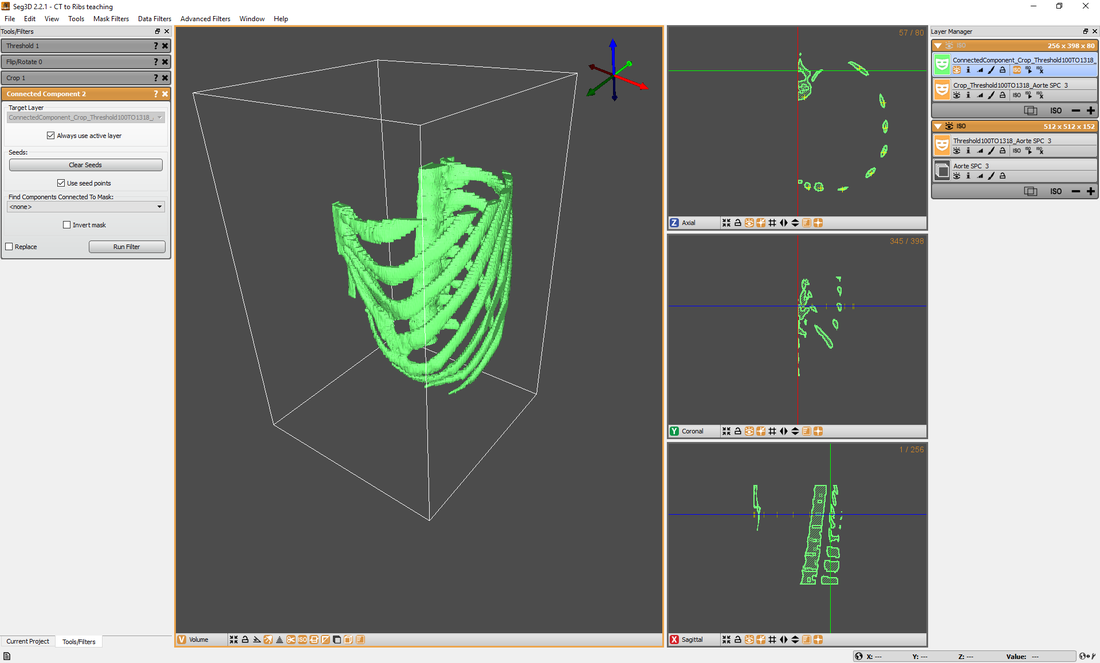
- Examine the resulting layer. You should now have a clean segmentation, with one continuous 3D model like the one shown below. If this hasn’t happened, try again with a different set of seed points
5. Fill Holes
- At this stage you can also use the hole filling tool, to make sure there are no errors in the volume. This may or may not be necessary depending on your thresholding and connected component filters
- Select “Mask Filters” from the tool bar and select “Fill Holes”
- As with the connected component tool you need to place some seeds and then run the filter
- Once you have a 3D model you are happy with you can export it as an .stl file
- You need to have created an isosurface using the isosurface tool
- Select “File” from the toolbar, and then “Export Isosurface”
- Save as an .stl file somewhere sensible.
Step Three: Refinement in MeshMixer
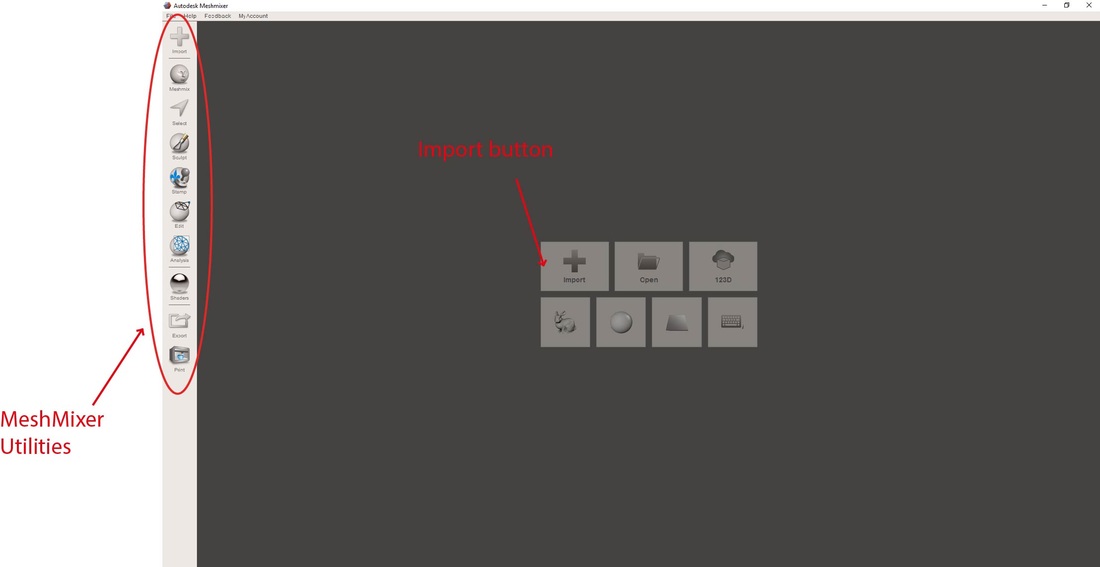
7. Import stl file
- Launch MeshMixer and click import
- Select the .stl file you created in Seg3D and import it into the workspace
- Take a moment to get familiar with the viewing pane and the MeshMixer environment
- It may be that you are happy with the current model. However, if you want to make it easier to print it can be tidied up with MeshMixer Utilities
- The simplest tool is the plane cut, which we will use to remove extraneous ribs. Select “Edit” from the ultility pane, and then “Plane Cut”
- Manipulate the plane so that it remove the majority of the incomplete ribs (those other than the bottom four). Do not worry if some fragments of the ribs are left.

- Following the plane cut, the select tool can be used to highlight fragments and discard them. First, highlight any remaining fragments with the select tool
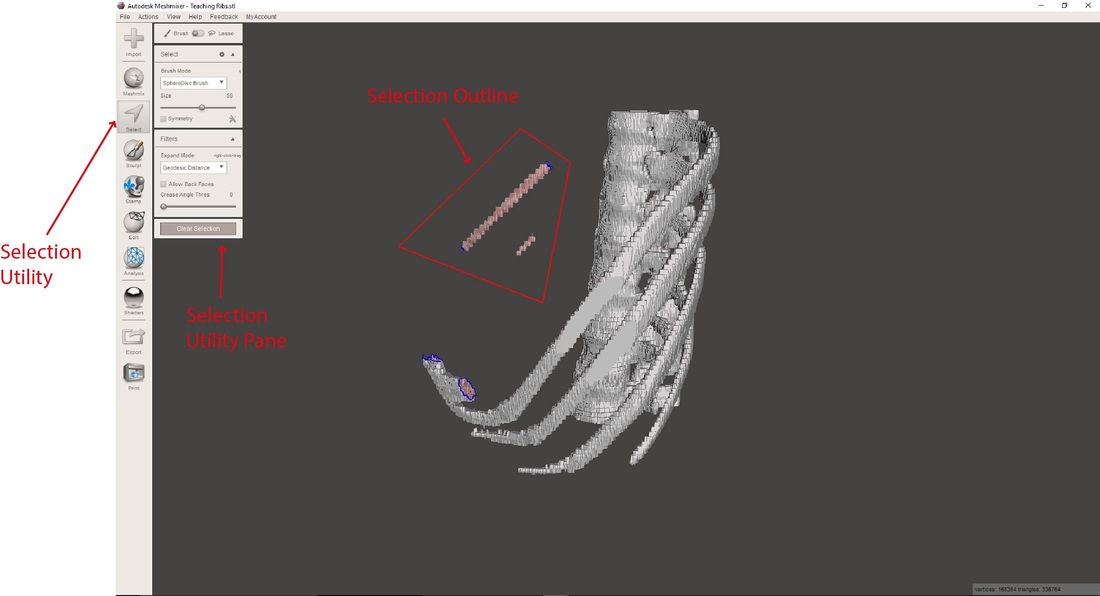
- Once a necessary area is highlighted, click “Edit” in the Selection utility pane, and then “Discard”
- Continue to use this utility to tidy up the mesh until you are left with a single piece
- The next step is to make the cropped mesh into a solid part. Select “Edit” in the utility pane, and then “Make Solid”
- Key options in the utility pane are “Mesh Density” Which affects how many elements the mesh is made of and “Solid Accuracy” which defines how closely the solid part adheres to the original
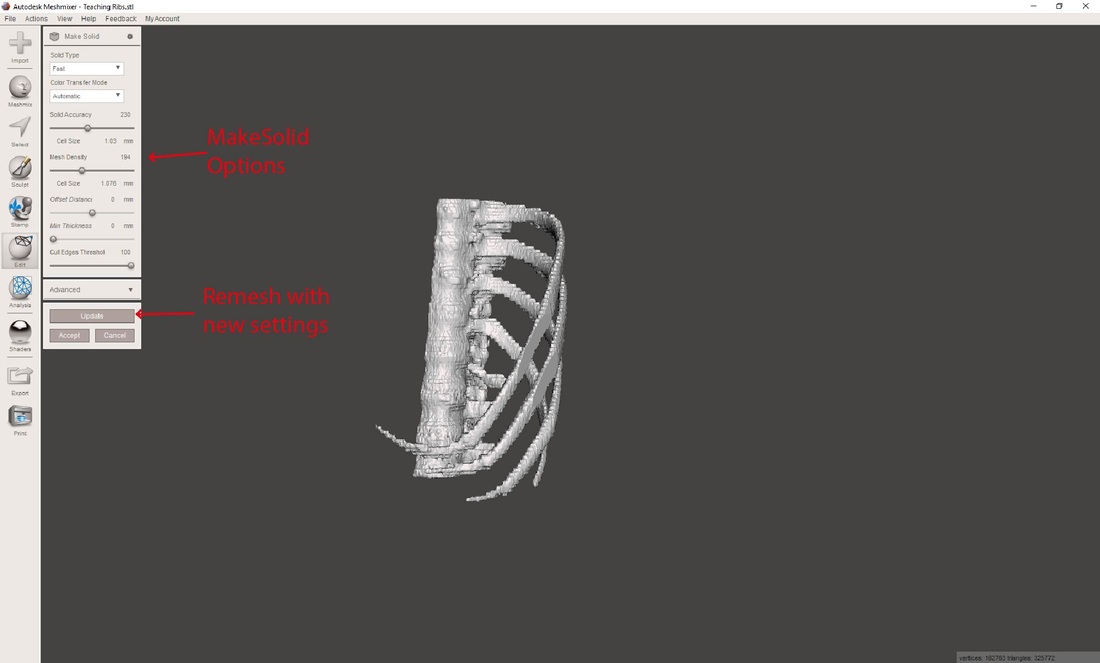
- Tweak the values and press “Update” to see the effect. Set the values close to 1mm before pressing accept
- The final step is smoothing the mesh in order to remove the voxel edges that arise from staircasing
- Highlight the entire mesh using the select utility
- In the Utility pane select “Deform” and then “Smooth”
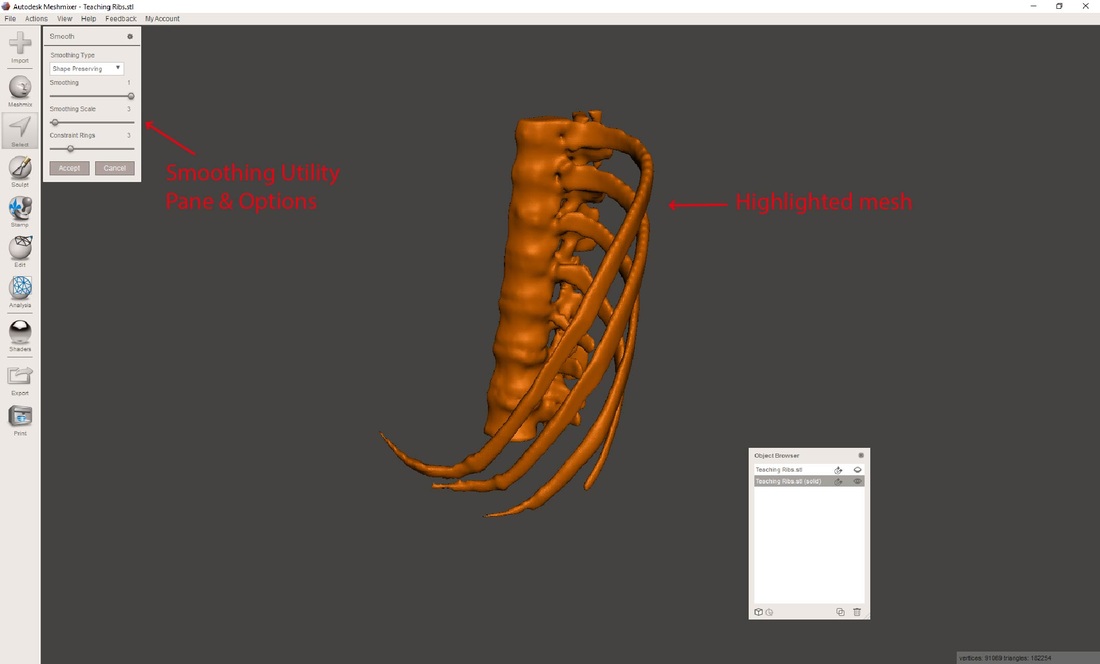
- The different options define the extent of the smoothing. Tweak them in order to see the effect. If you find it difficult to obtain an acceptable result set Smoothing: 1, Scale: 3, Contraint: 3
- Once you are happy with the mesh refinement it is time to export the final product
- Select “File” from the toolbar, and then “Export”
- Save as .stl. Now you have a complete, high quality rib model ready to be imported into 3D printing software!