
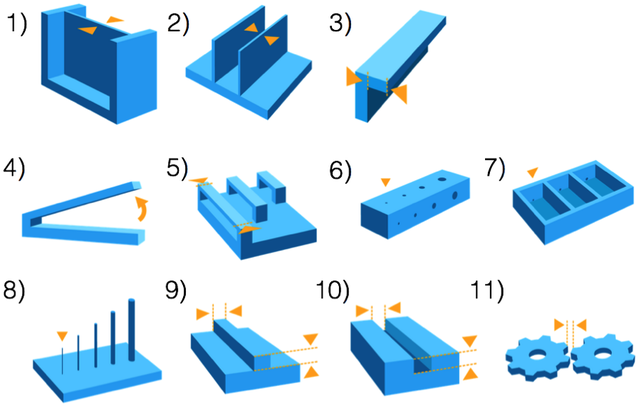
Minimum Feature Constraints
- It's a good practice not to design small details in your model close to the limit of your printer. The chances of a failure during printing are increased.
- PreForm will recognise features as small as 300 microns and features smaller than that won't be visible in your printed model.
Design Specifications
- Minimum Supported Wall Thickness - Recommended value: 0.4 mm
- Minimum Unsupported Wall Thickness - Recommended value: 0.6 mm
- Maximum Unsupported Overhang Length - Recommended value: 1.0 mm
- Minimum Unsupported Overhang Angle - Recommended value: 19° from level
- Maximum Horizontal Support Span/Bridge - Recommended value: 21 mm (5 mm width × 3 mm thick)
- Minimum Vertical-Wire Diameter - Recommended value: 0.3 mm (7 mm tall) to 1.5 mm (30 mm tall)
- Minimum Hole Diameter - Recommended value: 0.5 mm
- Minimum Drain Hole Diameter - Recommended value: 3.5 mm diameter
- Minimum Embossed Detail - Recommended value: 0.1 mm
- Minimum Engraved Detail - Recommended value: 0.4 mm
- Minimum Clearance - Recommended value: 0.5 mm
We refer to the FormLabs website at the bottom part of the webpage for more details in the design specifications.
Adapted From: http://formlabs.com/media/upload/formlabs-design-guide.pdf
Create a Hole to Allow Resin to Escape
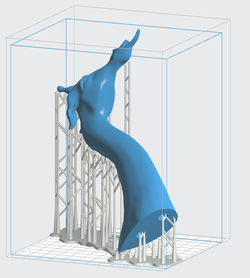 From: Formlabs.com
- Some resin might be trapped inside during the printing of hollow objects.
- Drain a hole to your model to allow the resin to escape.
- FormLabs suggests a minimum diameter of drain holes of 3 - 3.5 mm.
- Create a hole by deleting enough faces for the resin to escape during printing.
- If you create a hole, then your model won't be printed as a solid object. You need to shell it!
- An easy way is to extrude faces to the inside of the model. Not outside because it will increase your object's dimensions.
- You could also use the Solidify Modifier from Blender.
- Don't forget to disable the internal generated supports.